ULTRA++ installation guide

Installation PI5 / PI4 / ZERO (recommended)

Be sure to have your Pi OS to the last version then:

git clone https://github.com/RASPIAUDIO/ultra_install.git

cd ultra_install

sudo bash ultra_install.sh

sudo reboot

  • To test, open a terminal window and type:
speaker-test -l5 -c2 -t wav
  1. Recording Audio:
  • Volume control is managed by PulseAudio in Raspberry Pi OS, serving as middleware between the hardware and software. Enable PulseAudio in the raspi-config menu in Advanced - Audio Config:
sudo raspi-config

  • To record audio on the Pulse device, type:
arecord -D pulse -f S16_LE -r 48000 -c 1 -d 10 test.wav
  • To play back the recording, use:
aplay test.wav

Alternative Lightweight Automatic Installation Without Driver (Zero or lite OS version)

This method works without a driver by sending IĀ²C commands to initialize the codec at startup. It is ideal for lightweight installations, such as on the Raspberry Pi Zero series, you will only have basic control with this method : microphone, speaker and jack out but without fine control.

Steps:

  1. Open a terminal and run the following commands:

    git clone https://github.com/RASPIAUDIO/ULTRA.git
    cd ULTRA
    bash install.sh
    
  2. Enable IĀ²C in raspi-config:

    • Navigate to 3-Interface Options > 5 IĀ²C.
    • Select Enable.

```

  1. Reboot your system.
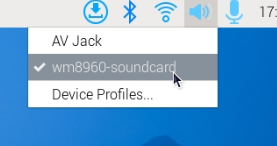
    you should have this on the desktop
    Playing Audio:
  • After rebooting, check if your sound cards are recognized. You should see the speaker icon on the desktop.
    Speaker Icon on Desktop | 375x133

Alternative Lightweight Manual Installation Without Driver (Zero or lite OS version) (If the Auto-Install Script Failed)

  1. Clone the GitHub repository:

    git clone https://github.com/RASPIAUDIO/ULTRA.git
    
  2. Copy the file to execute at startup:

    cd ULTRA
    gcc -o ultra ultra.c
    chmod 777 ultra
    cp ultra /etc 
    

    check if the script run as it should:

    /etc/ultra
    

    you should see this :
    image

  3. Set the script to execute at startup:

    • Open rc.local for editing:

      sudo nano /etc/rc.local
      
    • Modify the file to look like this:

image

 ```
  1. Configure the sound card:
    • Open config.txt:

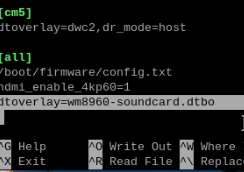
      sudo nano /boot/firmware/config.txt
      
    • Comment out the existing audio line by adding # in front:

      #dtparam=audio=on
      
    • Add the overlay for the sound card:

      dtoverlay=googlevoicehat-soundcard
      
    • Save the file and reboot your system.


Pinout:

GPIO PIN FUNCTION
GPIO2 PIN3 I2C SDA
GPIO3 PIN5 I2C SCL
GPIO25 PIN22 LED
  PIN17 3.3v
  PIN25 39 6 14 GND
GPIO19 PIN35 I2S LRCLK
  PIN2 4 5v
GPIO18 PIN12 I2S CLK
GPIO20 PIN38 I2S ADC
GPIO21 PIN40 I2S DAC
GPIO23 PIN16 BUTTON (this pin as an external pull up)

Device number
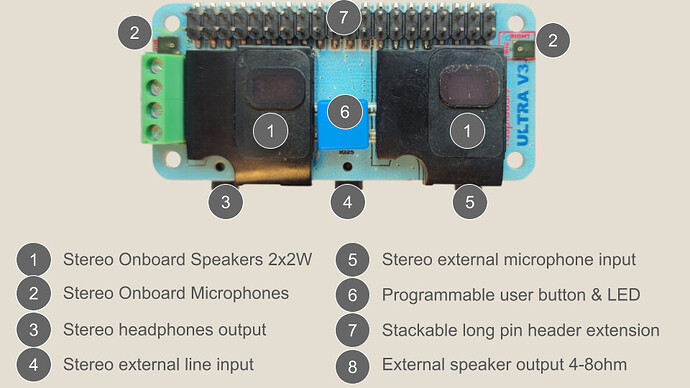
this will be usefull in the alsa mixer to understand what input is connected to which microphones
Onbard microphones:
Linput1
Rinput1

External microphone jack input:
Linput2
Rinput2

Line input
Linput3
Rinput3

External speakers/speaker output:
SPK_L
SPK_R

Presets

You will notice that alsamixer have a LOT of settings with that dac so it could be confusing at first to do what you want. So I made a few basic scripts to select different devices, these Alasa presets are here : GitHub - RASPIAUDIO/WM8960-Audio-HAT: The drivers of [WM8960 Audio HAT] for Raspberry Pi look for the preset_* files

For example download this Onboard microphones input and headphones output:

wget https://raw.githubusercontent.com/RASPIAUDIO/WM8960-Audio-HAT/master/preset_onboard_microphones_input1

For example to only enable the headphones and onboard speakers :

alsactl --file preset_onboard_microphones_input1 restore 0

sudo arecord -f cd -Dhw:0

Here are others scripts I have made:

External microphone input and headphones output:
preset_external_jack_microphone_input2

Onboard microphones input and headphones output:
preset_onboard_microphones_input1

Onboard microphones with high gain input and headphones output:
preset_onboard_microphones_input1_alotofgain

Headphones output:
preset_headphone_jack_output_only

External line input and headphones output:
preset_lineIN-jack_input3

Headphones ans speakers output:
preset_onboard_Speakers_and_headphone_jack_output

To save your own preset:

alsactl --file Mycustom_presets store

To restore your own preset:

alsactl --file Mycustom_presets restore

1 Like

I have just followed the installation guide for my RPi4 and it worked fine. I had to run the install script twice.
I would like to use this board on a Jetson Nano. Could you provide any guidance on doing that?
I am also replying on this because I noticed that the pinout seems to be wrong. Should not I2S CLK be PIN12? That seems to be how both the Nano and RPI configures their GPIO port for audio devices.

Hi and welcome!

Porting a the WM8960 codec on Jetson nano will involve some work as this codec usues some I2C commands to change volumes or to enable other options. Somebody already tried and I have found that:

Please share your results.

Yes, I have also found that and will try to see how it goes. Thanks for your response.

Hello there, thanks for the instructions. I have run the script on my raspberry pi 4 and it seems to be working (the soundcard gets recognized by alsa). But for some reason everything on the raspberry pi which has to do with the soundcard takes place really slowly. For example changing the volume works normal if the output is on analog (rpi onboard output), but if it is set to wm8960, after moving the volume slider it takes a few seconds for the slider to actually move! Some sound applications have also got really slow since I installed the soundcard. Audacity for example does not even launch after running and seeing the logo.
Besides I donā€™t hear any sound from the sound card. Neither from the speakers nor through the headphone jack. Do you know whatā€™s the problem?

p.s Iā€™ve run the second bash script from the end of your post as well.

Thanks in advance

Hi and welcome,
if you canā€™t hear any sound something failed, can you try in the download directory to run the uninstall script, and do install it again?

I did, it did not work again. I got following at the end of the installation:

DKMS: install completed.
Created symlink /etc/systemd/system/sysinit.target.wants/wm8960-soundcard.service ā†’ /lib/systemd/system/wm8960-soundcard.service.
Job for wm8960-soundcard.service failed because the control process exited with error code.
See ā€œsystemctl status wm8960-soundcard.serviceā€ and ā€œjournalctl -xeā€ for details.

running the systemctl command will give out:

wm8960-soundcard.service - WM8960 soundcard service

Loaded: loaded (/lib/systemd/system/wm8960-soundcard.service; enabled; vendor
Active: active (exited) since Tue 2021-02-23 13:33:00 CET; 5min ago
Process: 498 ExecStart=/usr/bin/wm8960-soundcard (code=exited, status=0/SUCCES
Main PID: 498 (code=exited, status=0/SUCCESS)

Feb 23 13:32:55 raspberrypi systemd[1]: Starting WM8960 soundcard serviceā€¦
Feb 23 13:32:55 raspberrypi wm8960-soundcard[498]: + exec
Feb 23 13:32:55 raspberrypi wm8960-soundcard[498]: ++ basename /usr/bin/wm8960-s
Feb 23 13:33:00 raspberrypi systemd[1]: Started WM8960 soundcard service.

running the test script will give out:

ā€“2021-02-23 13:34:26-- http://test.raspiaudio.com/
Resolving test.raspiaudio.com (test.raspiaudio.com)ā€¦ 217.160.0.133, 2001:8d8:100f:f000::268
Connecting to test.raspiaudio.com (test.raspiaudio.com)|217.160.0.133|:80ā€¦ connected.
HTTP request sent, awaiting responseā€¦ 302 Found
Location: http://raspiaudio.com/s/test [following]
ā€“2021-02-23 13:34:27-- http://raspiaudio.com/s/test
Resolving raspiaudio.com (raspiaudio.com)ā€¦ 217.160.0.133, 2001:8d8:100f:f000::268
Reusing existing connection to test.raspiaudio.com:80.
HTTP request sent, awaiting responseā€¦ 302 Found
Location: https://raspiaudio.com/s/test [following]
ā€“2021-02-23 13:34:27-- https://raspiaudio.com/s/test
Connecting to raspiaudio.com (raspiaudio.com)|217.160.0.133|:443ā€¦ connected.
HTTP request sent, awaiting responseā€¦ 200 OK
Length: 1129 (1.1K)
Saving to: ā€˜STDOUTā€™

  •                 0%[                    ]       0  --.-KB/s               -----> Test for Raspiaudio MIC+
    

------Please puch on the Yellow button to continue

  •               100%[===================>]   1.10K  --.-KB/s    in 0.002s  
    

2021-02-23 13:34:27 (598 KB/s) - written to stdout [1129/1129]

ā€“2021-02-23 13:34:27-- http://27/
Resolving 27 (27)ā€¦ 0.0.0.27
Connecting to 27 (27)|0.0.0.27|:80ā€¦ amixer: Unable to find simple control ā€˜Microā€™,0

amixer: Unable to find simple control ā€˜Masterā€™,0

Are you using the last version of Raspbian release 32bits 2021-01-11?

I downloaded and installed the raspbian in november 2020, so Iā€™m not sureā€¦ (kinda new to the whole rpi stuff)
but the command uname -a gives out:

Linux raspberrypi 5.10.11-v7l+ #1399 SMP Thu Jan 28 12:09:48 GMT 2021 armv7l GNU/Linux

Does this mean the release is from 2021-01-28 ? And should I use a specific verion of raspbian to get the soundcard work?

No it shouldnā€™t be limited to this release, but the idea is to try a tested working confirguration then add your other software components one by one to understand what make it fails. My advice is to start from a fresh copy of raspbian last version and run the install script again.

thx

1 Like

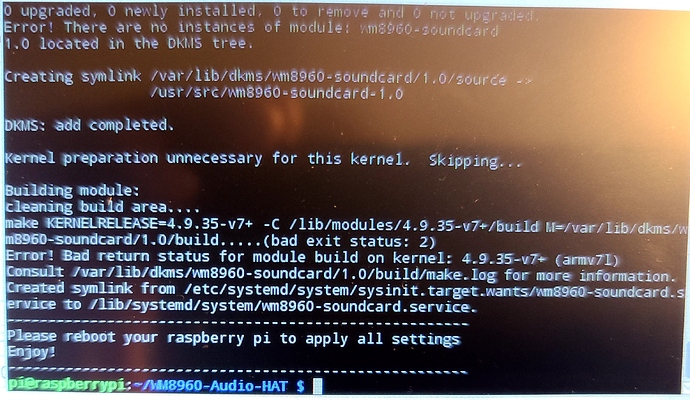
I have gone through all the steps to install Ultra on a Raspberry Pi 3 a few times, including uninstall and re-installs.
I get the following error messages at the conclusion of the install:

.

I donā€™t know where to go from here. Can someone walk me through the steps to correct this.

Hi Daniel,

Can you confirm that you are using :
"Raspberry Pi OS with desktop and recommended software

  • Release date: January 11th 2021
  • Kernel version: 5.4 "
    ?

Using command uname -a, I get the following
Linux raspberrypi 4.9.35 - v7+ #1014 SMP Fri June 30 14:47:43 BST 2017 armv71 GNU/Linux

this is an old version, is there any way you could do a a new sd with the last version or upgrade:

When I
sudo apt update
sudo apt full-upgrade

I get the same version response.4.9.35.

Then I think you need to flash a new SD card with the lattest version.

I was having trouble using the device on a raspberry pi 3. I was still running raspbian stretch and it seemed that was a problem. So I updated to buster using

sudo apt-get update
sudo apt-get upgrade
sudo sed -i 's/stretch/buster/g' /etc/apt/sources-list
sudo sed -i 's/stretch/buster/g' /etc/apt/sources-list.d/raspi-list
sudo apt-get remove apt-listchanges
sudo apt-get update
sudo apt-get full-upgrade -y

After the update was finished, I also ran rpi-update to update the firmware. Unfortunately, I still was not able to use the device. To resolve the issue, I installed a fresh raspbian image to another sd card and installed the device on this system. There it worked flawlessly, so I tried to figure out the differences between the two systems.
Turns out, that a specific firmware version seems to work with the device. The firmware version is 5.10.17
To use this specific version in your raspbian OS, use the following command to install it:

sudo rpi-update 78c1429cc1d5a200d824d2629c3ceba4ba4617fe

It works for me, let me know if it works for you.

Another thing: If you want to persist the settings that you have made with alsamixer, save your settings to the file /etc/wm8960-soundcard/wm8960_asound.state. That way the settings will not get reset after a reboot. Use the command

sudo alsactl --file /etc/wm8960-soundcard/wm8960_asound.state store

thanks for your feedback, I will try that

Here are some additional steps you may want to do:

  1. Comment line dtparam=audio=on in sudo nano /boot/config.txt

  2. sudo nano /etc/pulse/default.pa and then add the following lines and save.

    load-module module-alsa-source device = hw: 0,0
    load-module module-alsa-sink

The reason you want to disable onboard audio is because some version of Buster keeps changing the audio out to HDMI on reboot.

Thanks to RASPIAUDIO, I just received their hat. The above works for all the wm8960 based devices.

I have modified the asound.conf as well with a buffer. Will raise a PR in the git.