Modulox satellites
Setting
Connect the modulox with a USB cable. Then go on The online editor last version.
If you have an old version, you can either update the firmware of all your modulox to take advantage of the latest features (see section “loading new firmware” below), or access the editors corresponding to your previous firmware versions:
Editor V0.38
Editor V0.37
Editor V0.35
Editor V0.34
You can download the offline editor here it could be useful if you are not connected to the internet while doing your configuration.
Click on ![]() to establish the connection with the modulox.
to establish the connection with the modulox.
If it is detected, the button turns green and one or more modules appear on the right of the screen. You can move them on the central grid. When you move a module to the editor, the physical module flashes. If there are several, you can find them and place them in the same order.
Once all the modules are placed, you can now set them in detail. For that you have two solutions:
. Settings encoder by encoder
Go to the tab ![]() then click on the encoder you want to configure. A red circle
then click on the encoder you want to configure. A red circle  indicates the selected encoder The encoder will flash on the module so that you are sure to set the correct one.
On the right, several parameters appear. The first to select is the mode,![]() because it will condition all the other parameters. If you choose “Toggle” mode there will be a DC signal sent back when you turn the encoder to ON mode. If you press the button it goes into OFF mode. The different modes are described in the help topic, you must choose the most suitable for your needs.
because it will condition all the other parameters. If you choose “Toggle” mode there will be a DC signal sent back when you turn the encoder to ON mode. If you press the button it goes into OFF mode. The different modes are described in the help topic, you must choose the most suitable for your needs.![]() .
.
You can access a lot of parameters by clicking on the button ![]() . You can for example choose the color that the encoder will take if a button is pressed, for a parameter of type “Turn” you can select the “Logarithmic” mode which will follow the speed at which you turn the encoder, or "normal “, Which will be incremented by a step defined by” sensibility ".
. You can for example choose the color that the encoder will take if a button is pressed, for a parameter of type “Turn” you can select the “Logarithmic” mode which will follow the speed at which you turn the encoder, or "normal “, Which will be incremented by a step defined by” sensibility ".
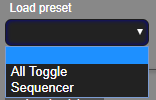
. Preset setting
To save time, you can load presets to apply a particular setting mode to all encoders. Whether you have 1 or more connected modules, an algorithm will give different MIDI notes or CC between different functions so that there is no conflict. To load a preset, just select it from the drop-down list of presets
.
. Patch settings
If you want to save your configuration to reload it later, or exchange it with someone, or even with us you have problems with your patch, you can save or reload it with the “Load patch” and "Save patch »
Once all the encoders set by one method or another just load the configuration in the memory of the modulox by clicking on the button![]() . As long as you do not do this, no changes will be taken into account in the module (s).
. As long as you do not do this, no changes will be taken into account in the module (s).
Ableton plugin
Modulox has full integration into Ableton. For that we have to start by downloading one of the plugins :
Modulox2.
Modulox3.
Modulox5.
Then you have to uncompress the archive and put the “modulox” folder in the Ableton remote script folder, by default here: C: \ Users \ All Users \ Ableton \ Live 10 Trial \ Resources \ MIDI Remote Scripts.
The xml file is the corresponding patch that you have to load with the editor.
So if you want to use Modulox2 in ableton, first load Modulox2 patch.
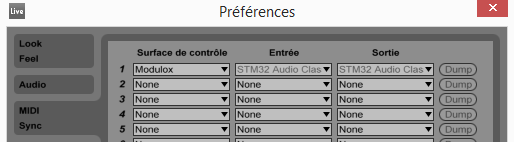
Plug in the modulox, open Ableton, go to “Options”, then “Preferences”, go to the MIDI tab, then in the control surfaces select “modulox”.
Here are plugins details:
. Modulox2:
Each encoder sets a track. If rotating the encoder, it changes the volume, and if pressing, it mutes/unmutes the track.
. Modulox3:
The 2 first encoders can change tracks and clip. So you can navigate in all the clips of your song.
If pressed, first button lanches/stops a clip, second button solo selected track, third button mutes/unmutes track, and fourth arms/unarms track.
. Modulox5:
The two encoders on top allow you to select the clip on the first two tracks. Once the clip is selected, just press the encoder to start, record or stop the clip if it is already playing.
The encoders below allow to modulate the volumes of the two tracks. If the color of the encoder is red, the track is in record mode. If green, it’s in playing mode and, you can change the volume.
Loading new firmware
Download ST Microelectronics’ CubeProgrammer software CubeProgrammer. There are mac / Win / Linux versions.
Download the firmware version that suits you:
Moduknob V0.39 (new)
Moduslide V0.39 (new)
Modutouch V0.39 (new)
Moduknob V0.38 (stable)
Moduslide V0.38 (stable)
Modutouch V0.38 (stable)
Install the software and then start it.
Keeping the button DFU pressed while not yet powered, then plug in the Modulox.
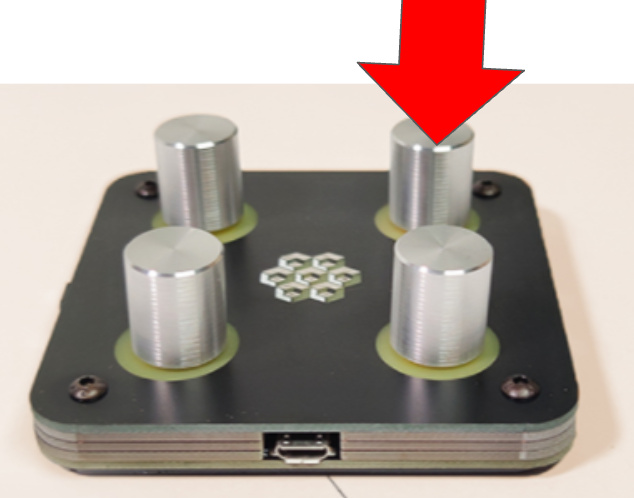
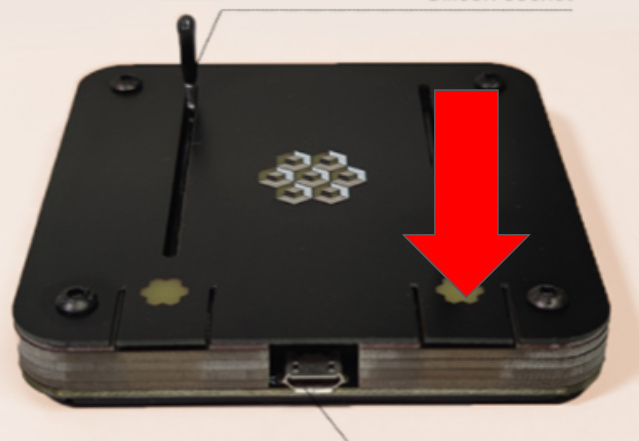
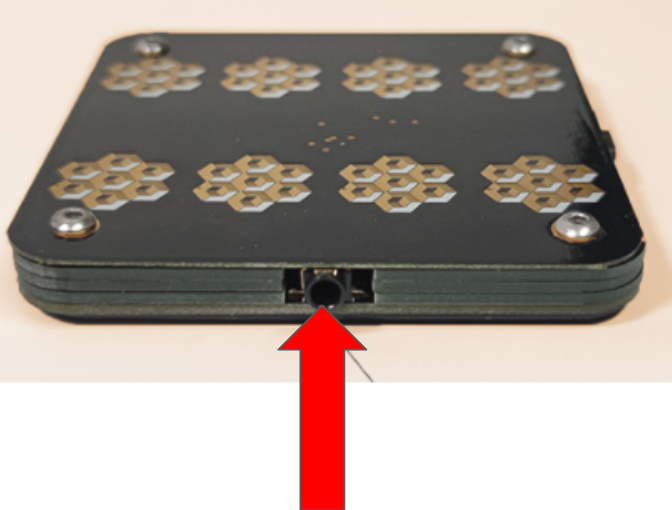
The DFU button is located at different places according to the model of your Modulox: (to do add drawing to this section)
- Modu-Knob : the DFU button is here
- Modu-Slide : keep the button is the one below the right slider.
- Modu-Touch: it is a bit different as you need to insert a paperclip thru the jack to reach the button.
Important : You must press the button before plugging-in the USB and only release it after it is plugged in. The modulox should not turn on wih normal software, this is normal as it boot in DFU mode. If it turns on (led blinking), it is not in DFU mode, then unplug it and start the operation again.
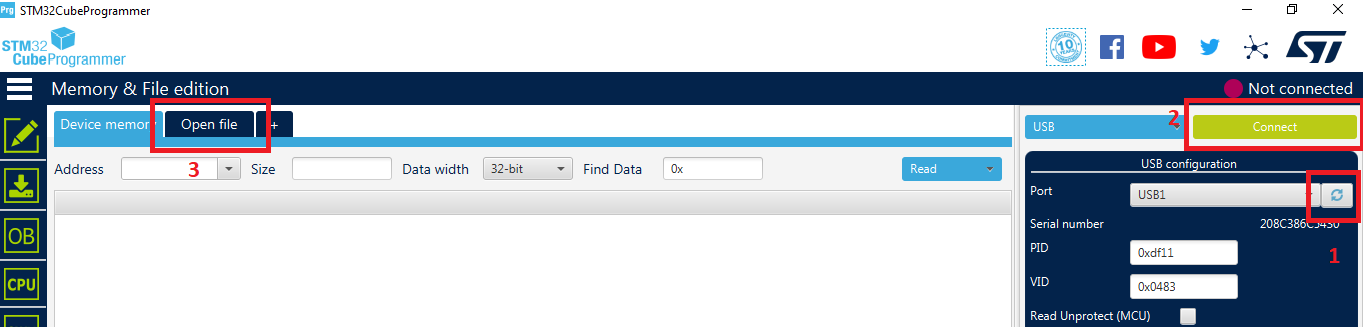
- Ask the software to find the USB port where the modulox in DFU mode is connected. You should see a port appear.
- Click on “Connect”
- Click “Open File” and choose the firmware you downloaded.
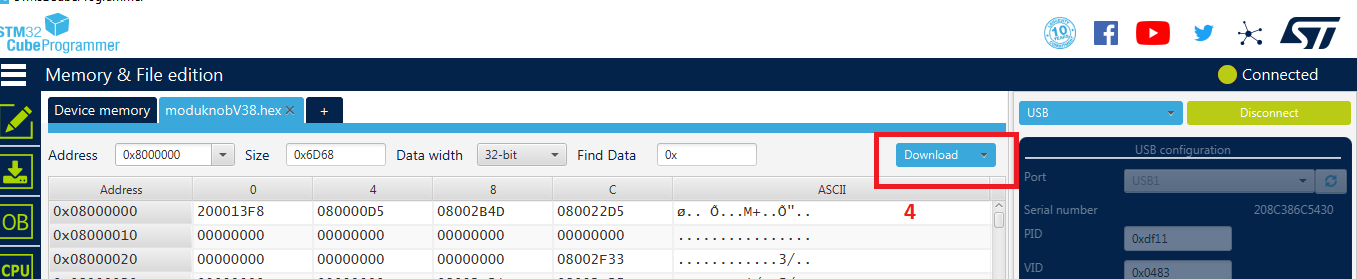
- Click on "Download.
- Click on “Disconnect”, then disconnect the modulox and reconnect it normally, without pressing the button.
sequencer
To access the “Sequencer” tab, you must first choose the “Step” sequence mode in the “Module” tab:

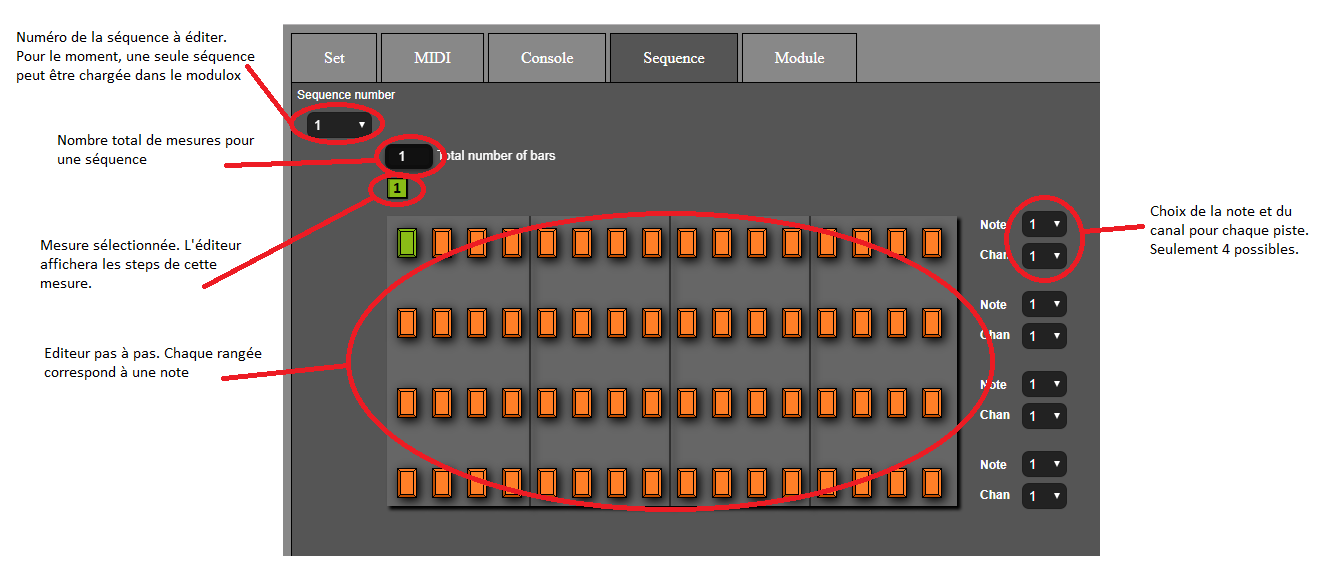
The sequencer makes it possible to load in the memory of the modulox a sequence with maximum 4 measurements of 16 steps, and 4 different notes. It is suitable for rhythms, and not enough for melodies (unless you want to make a bass line on 4 notes).
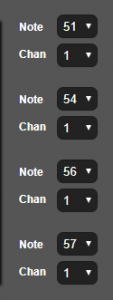
We must first choose the notes and channels we want to use. If a kick is on the MIDI note 51, the snare 54, charley closed on 56 and open charley 57, we can configure as in the diagram on the left.
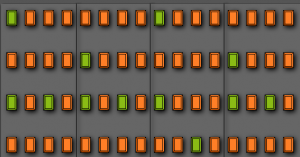
Then you just have to write your rhythm in the fruity loops style grid. In green, the note is On, and in orange it is Off.
Example of a classic “poum chacha” rhythm:
If the rhythm is more than one measure, you can change the total number of measures, then select the measure you want to edit ![]()
When you press the “Write” button, the sequence will be loaded into the modulox’s memory.
Triggering and setting the sequencer
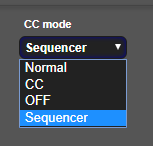
You must first configure a button that will allow you to select the sequence mode. For that you have to go into the Detail of a parameter of the encselected odor, and choose the “Sequencer” mode. The choice of parameter values changes. If it is a “push” type parameter, you can choose between “Start” and “Stop”, if it is a “turn” type parameter, you can choose between different actions such as “BPM”, “Volume” …
A typical configuration and put an encoder in “Toggle” mode, then assign the BPM to the CC parameter, and assign the Start / Stop to the note parameters. Thus, when the encoder is pressed and it lights up in green, the sequencer starts. When you press and it turns red, the sequencer stops. When we turn the encoder, we change the BPM.
You can also save time by loading the “Sequencer” preset which sets all the sequencer functions on a moduknob.
arpeggiator
The arpeggiator can generate sequences of notes.

To access the tab, you must configure the module (“Module” tab) in “Arpeggiator” mode.
In this tab, you can enter up to 8 arpeggios. Just click on the keyboard to add a note, and click again to delete it. You can add only 4 notes per arpeggio.
Several options allow you to modify this sequence of notes, and can be assigned to CC parameters.
As for the sequencer, in the detail of the parameters of the encoders, it is necessary to select the option “Sequencer”.
Then, several parameters allow to modify the composition and reading of the arpeggio:
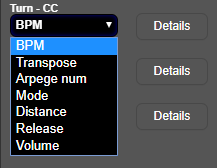
BPM : to edit the BPM.
Transpose : change the pitch of the tune of the chord (or the first note)
Arpege num : Select the number of the arpeggio you entered in the “Arpege” tab
Fashion : choose a reading one way or the other, or randomly.
Distance : Repeat the scheme over several octaves.
Release : the time played by a note.